Please allow me to introduce today’s guest blogger, Nicole Weinmann of Trinity Ridge Photography. Not only is she amazingly sweet and but she’s also a wonderful photographer…and I should know since she shot my wedding! (You can actually check out some of her photos of our wedding in the spring edition of Arkansas Bride or in my Time Capsule 2010: My Year in Photographs post.) It is with the utmost confidence that I leave you in her more than capable hands. So, Nicole, it’s all yours.
Picture Perfect Portraits
-by guest contributor Nicole Weinmann* * *
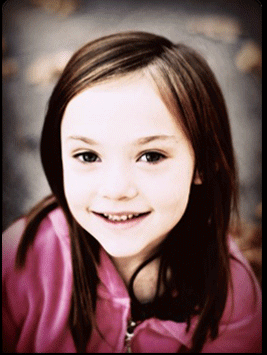
When Alli suggested that I do a blog post to show people how to turn their ordinary snapshots into something beautiful – I thought, what a great idea!! Being a professional photographer, it’s easy to use years of experience with a camera and expensive editing and retouching software to make my portraits look great. So, I thought it would be an awesome little challenge to take one of my normal family snapshots and edit it using free software online that anyone can use. Picnik seems to be a popular website for editing pics online, so I decided to upload one and give it a go. Below are the 10 steps I used to take my snapshot and turn it into a darling little artistic portrait of my daughter.
First, you’ll want to head to www.picnik.com and click the button on the left of the page that says Upload photo. Choose the portrait you want to upload and get started!
Step 1. Crop
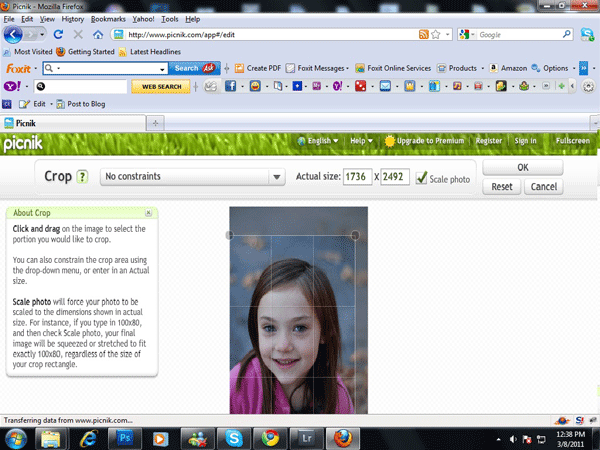 You’ll want to crop your portrait first (if it needs to be done). Please ignore the urge to follow tradition and always keep your subject in the center of your portrait. This is not necessary and is quite frankly – somewhat boring. I decided I wanted more a close-up in this portrait so I cropped a bit of it off. I’m not going to describe each button in detail because Picnik is super user-friendly and describes how to use each button you’ve chosen on the left of the screen. Just make sure you click OK on the upper right hand side of your screen when you are finished.
Step 2. Vignette
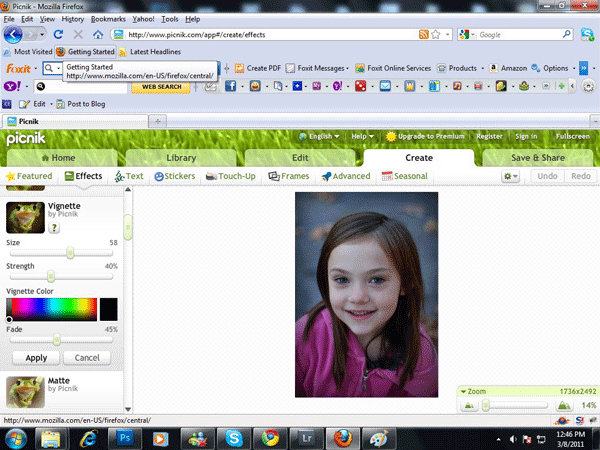 At the top of your screen you will see five tabs, Home, Library, Edit, Create, and Save & Share. If you click on Create, you will have the option to then click on Effects. You will see the Vignette option on the left. You can see the settings for the vignette that I chose, but of course, you can change those as you see fit. The size tells you how much of your picture the vignette will cover, the strength is how dark it will be and the fade is how blended from the outside to the inside it will be.
Step 3. Exposure
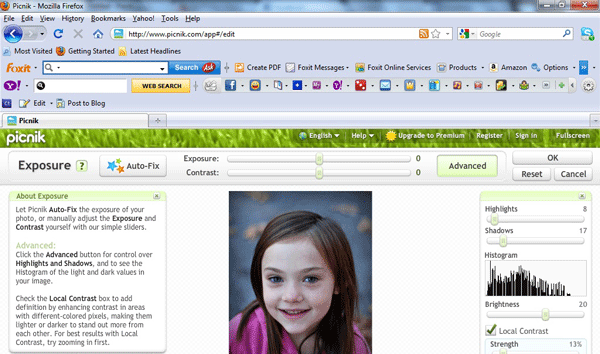 Click back on the Edit tab at the top of your screen and click on Exposure. If you don’t want to mess with the controls you can click Auto Fix, but me being me – I clicked on the Advanced button. LOL. I made the portrait brighter first, then the adjusted the highlights and shadows.
Step 4. Colors
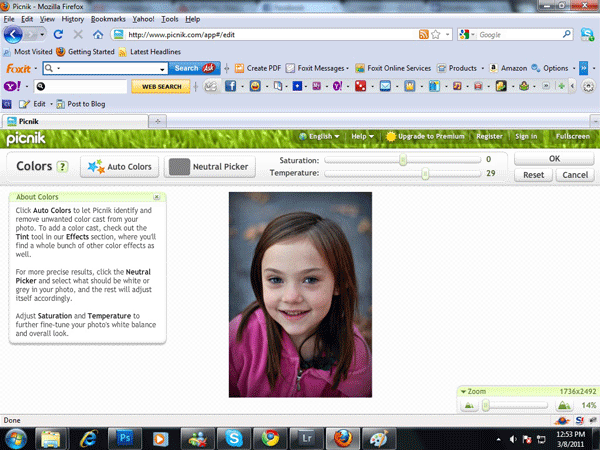 Click the Colors button and you will be able to adjust the Saturation and the Temperature. The saturation adjusts how “saturated” your colors are. The temperature basically either adds blue, making your picture cooler, or orange which makes your picture warmer. I didn’t change the saturation in mine, but I did make my picture warmer on the temp scale.
Step 5. Soften
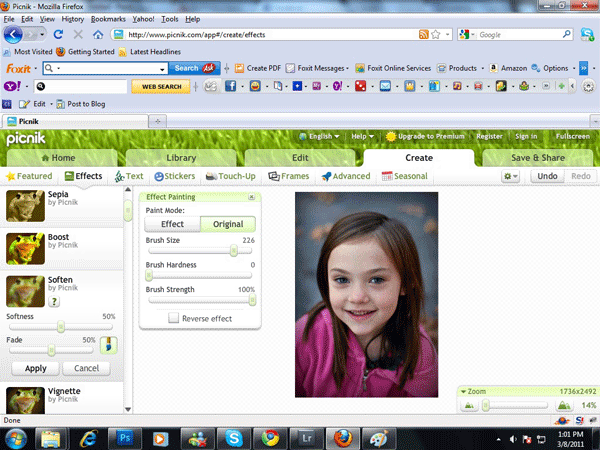 Click on the Create tab at the top of your screen. On the left you will see the Soften option. Once you click it, it will automatically add a softening effect to your whole portrait. You then have the option to use your mouse to brush over the parts of your portrait you want to take the softening OFF of. I erased the softening off of her face and left it everywhere else. Once you are done, click Apply.
Step 6. CinemaScope
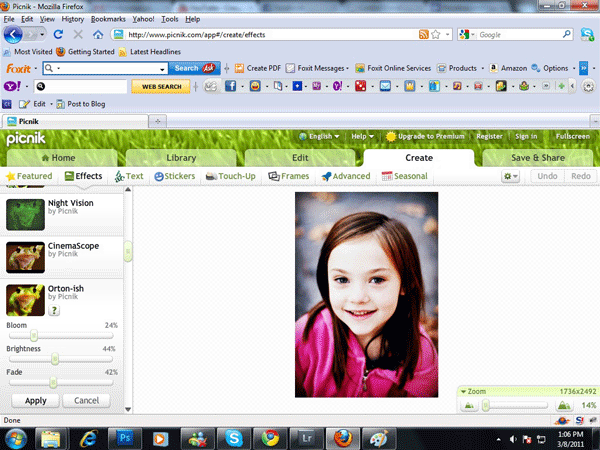 Still in the Create tab, you will find the CinemaScope effect on the left. Click it, and then uncheck the “Letterbox my photo” box.
Step 7. Orton-ish
 The Orton-ish is another effect on the left, as are the next two effects we will be
doing. After clicking it, you will notice there are extra adjustment sliders for it. You can see where I put mine for the desired effect.
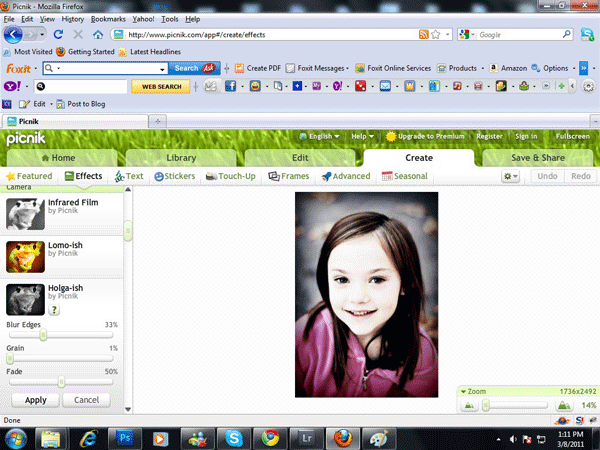
Step 8. Holga-ish
 When you click this effect you’ll notice it changes your pic to b&w. However, the fade slider on the left will allow you to customize how much of the effect you want on your portrait. Again, my adjustments are shown in the screenshot above.
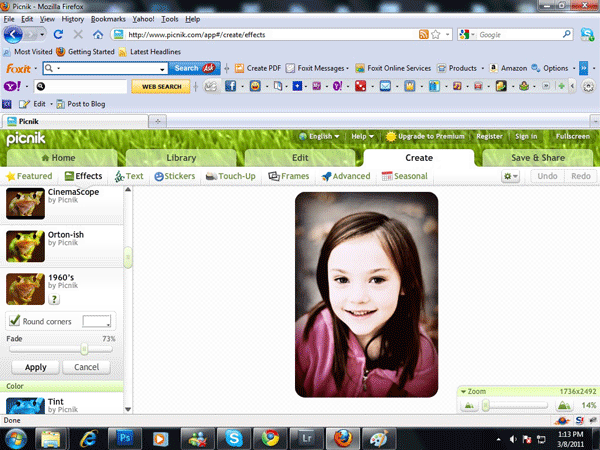
Step 9. 1960’s
 This is the last effect I put on the portrait. I adjusted the fade of it on the left and just left the portrait with a nice warm glow and some cute, but unnecessary, rounded corners. Don’t forget to click Apply when you’ve finished adjusting!
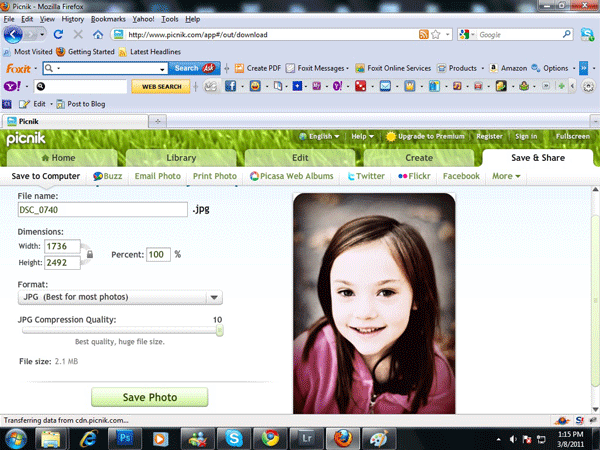
Step 10. Save and Share
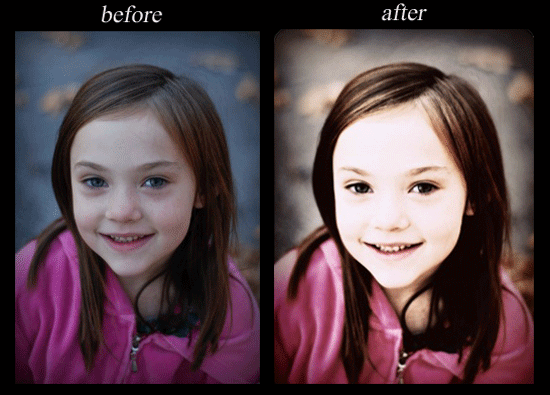 Last but not least, click on the Save and Share tab at the top right! You can name the file there and choose the size that you want to save the portrait. You can change the format, but for most purposes you’ll want to save it as a jpg. I save everything at the highest compression quality as possible, so for this site, it’s a 10. Once you’re ready, click Save Photo and you’re done!
Hope you enjoyed this mini tutorial on how to make artistic portraits out of your everyday snapshots for free online. After going through this process once or twice, it can probably be done in about 5 minutes total and is a huge improvement over the original – PLUS, it’s FUN!
-Nicole
You can connect with Nicole and Trinity Ridge Photography on Facebook or follow her work on the Trinity Ridge blog.


